
Download Boating Tip #45: Chartplotters (PDF format, 190KB)
As navigation technology has advanced, hand held GPS receivers have further evolved into chartplotters. Chartplotters graphically display a vessel’s position, heading and track on a LCD screen using charting software or cartographic chart cards (C-cards) and information gathered from the Global Positioning System (GPS) satellites. Chartplotters may also display data gathered from other compatible, on-board instruments on a network or integrated system, such as autopilots, wind instruments, knotmeters, and depth sounders, using NMEA, SeaTalk, or high speed bus data. Some chartplotter display units are also capable of showing RADAR, data logs, or SONAR information. More than one screen can be displayed simultaneously, to provide instant data to the navigator or helmsperson. Chartplotter display units usually include a LCD display, trackpad, control keys, and C-card slots. Master and repeater units can be installed. They can be illuminated for nighttime use, and are waterproof so they can be installed either above or below deck, or both.
After learning to use a chartplotter, the mariner should be able to:
- Use the various display control keys
- Switch the display on and off, and switch between modes
- Set chart orientation
- Change the lighting and contrast
- Select menu and screen options
- Read the status bar
- Obtain a fix
- Find vessel position at any given time
- Adjust range scale and zoom in and out
- Enter way points
- Plot and follow a route
- Display a vessel’s trackline
- Find Course Over Ground (COG), Speed Over Ground (SOG), cross track error, and Estimated Time of arrival (ETA) at a waypoint or destination
- Measure distances
- Set arrival and anchor alarms
- Obtain a range and bearing to an object or position
- Acquire information about a charted object
- Use the MOB function to navigate back to an object or man overboard
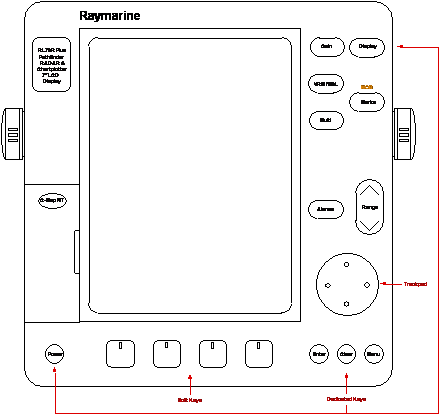
Display Control Keys
Display control keys are used to access or enter data. There are 4 types of display control keys: dedicated control keys, range toggle, a trackpad, and soft keys.
Display Control Keys: Dedicated Control Keys
- Power
- Turns the unit on or off
- Enter
- Confirms an option, accepts changes or performs the selected task
Takes cursor control of an object - Clear
- Cancels an operation and returns to the previous display
Deletes an object or function under cursor control - Menu
- Displays soft keys
- Alarms
- Displays the alarms set up menu and soft keys
In RADAR mode: Used to select / adjust guard zones - Multi
- Controls lighting and contrast
In RADAR mode, also controls alarm sensitivity and receiver tuning - VRM / EBL
- Variable Range Marker / Electronic Bearing Line
Measures range (distance) and bearing (angle) to a target or between two points - Gain
- Not use in Chart mode
In RADAR mode: Allows adjustment of FTC (rain clutter in the distance), Rain (rain clutter around the boat), Sea (sea clutter), and Gain (background noise) - Display
- Moves between Chart, RADAR, and Data Log modes
- Marks (MOB)
- Displays waypoint soft keys
Places a mark (waypoint) at the cursor position
If held for 2 seconds, activates or cancels MOB
Display Control Keys: Range
- Range
- Changes chart scale
Press the top of the key to increase range (zoom out)
Press the bottom of the key to decrease range (zoom in)
Display Control Keys: Trackpad
- Trackpad
- Controls the cursor (cross–hair symbol) visible on the display and allows the cursor to move up, down, right, left or diagonal
Allows you to select an item in a pop–up menu
Used to adjust the level of any of the variable soft key controls
Used to spell words (like on a video game)
Display Control Keys: Soft Keys
- Soft keys
- Labels appear on the screen just above the keys
Functions change depending on what is on the screen
Pop–up Menus
Pop–up menus provide options:
- Soft keys associated with the particular pop–up menu will appear
- Use the trackpad to select an option from the menu
- Use the soft key to set the option you want
Data Boxes
Allow you to customize what additional information appears on the display screen (Ex. Time):
- Press the SCREEN soft key
- Press soft keys to toggle between ON and OFF to see the cursor position in latitude / longitude or bearing / range, chart grid lines of latitude and longitude, data boxes
You can move data boxes around on the screen:
- Make the cursor context sensitive by placing the cursor over the data box until the letters BOX are displayed, then pressing ENTER
- Move the data box to a new location on the screen using the trackpad
- Press ENTER to return to normal cursor operation

Databases
- Database lists can be created and saved
- Examples: Waypoints, routes, tracks
- You can view, edit and select items from lists you have created
- Soft keys associated with the particular database will appear
- Use the trackpad to select an option from the list
- Use the soft key to edit the item

Switch the Display On
- Turn on the breaker located on the 12 V electrical panel
- Press and hold the POWER key until it beeps to turn the unit on
- A caution appears on the screen. Read the warning, then press the CONTINUE soft key.
- If a chart card is installed, the display will show the last area displayed
- If a chart card is not installed, a small scale (large area) world map will appear

Inserting a Chart Card
- Make sure that the card is a C–Map NT C–card
- Open the cover on the lower left corner of the display
- Hold the card with the label toward the left
- Push the card gently into one of the two available slots
- When fully inserted into the slot, move the card slightly to the right and under the retaining pegs
- Close the cover until it clicks tightly shut
- The new chart information will be displayed when you move the cursor to an area covered by data on the chart card
- Chart scale ranges from 1/64th of a nm to 4,000 nm
Removing a Chart Card
- Open the cover on the lower left corner of the display
- Press on the card you want to remove
- Move the card slightly to the left and from under the retaining pegs –– the card will spring part way out
- Grip the card and pull it from the slot
- Close the cover until it clicks tightly shut
Switch the Display Off
- Press and hold down the POWER key for 3 seconds
- A countdown timer will be displayed
- When the timer counts down to zero, a beep will sound and the display will turn off
- Release the POWER key

Setting Parameters
Press MENU and the set up parameter soft keys will appear:
- SYSTEM SET UP…
- CHART SET UP…
- TRACK SET UP…
- GPS SET UP…
Make your selections and set the options, units or parameter values, according to your personal preferences, then press ENTER
Switch Between Modes
- The DISPLAY key is used to move between Chart, RADAR, and Data Log modes (if available)
- Each time the DISPLAY key is pressed, you will cycle to the next mode
- Press ENTER to select the mode, or CLEAR if you change your mind

Split Screen Option
- Press DISPLAY
- Use the soft key to select WINDOWS ON
- Use the trackpad to move between the split screen options
- Each time the trackpad is pressed, you will cycle to the next split screen option
- Or, use the soft key to view a particular split screen
- Press ENTER
- If the screen is split between Chart and RADAR, you can switch trackpad control between the two using the soft key RDR CHRT
Split Screen Option: CDI Window
- Top half of the screen will display either the chartplotter or RADAR data
- The bottom half of the screen will display:
- Course Deviation Indicator (Highway screen)
- Cross track error (XTE), waypoint bearing (WPT BRG), waypoint range (WPT RNG), and time to go to next waypoint (TTG), data boxes

Split Screen Option: BDI Window
- Top half of the screen will display either the chartplotter or RADAR data
- The bottom half of the screen will display:
- Bearing and Distance Indicator graphic display showing your heading and a line pointing toward the waypoint
- Cross track error (XTE), waypoint bearing (WPT BRG), waypoint range (WPT RNG), and time to go to next waypoint (TTG), data boxes

Split Screen Option: Navdata Window
- Top half of the screen will display either the chartplotter or RADAR data
- The bottom half of the screen will display:
- Up to 9 data boxes that you specified from the set–up menu, such as: position, speed, COG, SOG, depth, time, date, cross track error, wind direction, water temperature, autopilot status, bearing and range to next waypoint…

Split Screen Option: Chart / RADAR Window
- Top half of the screen will display either the chartplotter or RADAR data
- The bottom half of the screen will display either the chartplotter or RADAR data
Full Screen Option
To return to a full screen view from split screen view:
- Press DISPLAY
- Use the soft key to select WINDOWS
- Press ENTER
Set Chart Orientation
- Chart default orientation is North Up
- You can set heading modes to:
- Head up – Vessel’s heading is at top of the display
- North up – North is always at the top of the display like on a paper chart
- Course up – Your course is displayed at top of display and as your heading changes the picture redraws to display the new course at the top
- To change display orientation:
- Press the HDG MODE soft key
- Press the soft key corresponding to the mode you want to select
- Press ENTER
- Recommendation: Do not change the chart orientation (north up) to correspond with the relative motion RADAR orientation (head up) in order to synchronize the displays unless you tell everyone aboard that you have done so
Change the Lighting and Contrast
- Backlighting and contrast can be adjusted
- Press the MULTI key to get to the soft key controls
- The LIGHT soft key turns the lighting on or off
- Use the trackpad right or left to select Light or Contrast
- Press the trackpad up or down to select a lighting level or increase or decrease the setting of the level
- Press the trackpad up or down to change the contrast
- Press the ENTER key to confirm your choice and return to the main screen

Status Bar
- The status bar is located at the top of the display screen
- In chartplotter mode, the status bar indicates:
- Chart range
- Cursor position
- Bearing
- Range
Find Vessel Position at Any Given Time & Obtain a Fix
- Press the FIND SHIP soft key
- Chart will be redrawn with your vessel at the center of the screen and the cursor over the vessel
- Vessel position will be displayed in the status bar
- If paper charting, transfer this position to the chart and label the position as an electronic fix
- Use FIND SHIP when you want to record your coordinates –– remember that the GPS coordinates are displayed at the cursor location, which is not necessarily the same as the vessel position
Enter Way Points
- A waypoint is a position entered on a chart as a reference, place to go, or place to return to
- Waypoints are stored in a database called a waypoint list where you can display or edit data
- Waypoints can be placed at a cursor position, at a vessel position, or at a particular latitude and longitude
Placing a Waypoint at a Cursor or Vessel Position
- Press MARKS
- Position the cursor where you want the waypoint to be
- Press the soft key PLACE WPT AT CURSOR or the soft key PLACE WPT AT VESSEL
- Press the soft key GOTO WAYPOINT to go to the waypoint
Placing a Waypoint at a Particular Latitude and Longitude
- Press MARKS
- Press the soft key WAYPOINT LIST
- Press the soft key MAKE NEW WAYPOINT
- The WPT POSITION (LAT/LONG) screen and its associated soft keys will be displayed
- The waypoint will be given a default symbol and will be named with the next available number
Editing a Waypoint
- Press the soft key EDIT WAYPOINT
- Press the soft key SYMBOL, highlight the symbol you want to use then confirm by pressing ENTER
- Press the soft key NAME WAYPOINT, then use the trackpad to enter or edit the name
- Press the right or left sides of the trackpad to select the space, letter, number or character you want to change
- Use the top or bottom of the trackpad to scroll through the alphabet, numbers and characters
- Press ENTER to save the name which will now replace the default waypoint number
- Press the soft key POSITION
- Select LAT, LON, BRG or RNG soft keys
- Use the trackpad, as described above, to edit the data
- Press ENTER to save the position
- Press ENTER again to return to the display screen
Erasing a Waypoint
- Press MARKS
- Press the soft key WAYPOINT LIST
- Select the waypoint you want to delete, then press the soft key EDIT WAYPOINT
- Press the soft key ERASE WAYPOINT
- NOTE: A waypoint that is saved in a route cannot be deleted
Plot and Follow a Route
- Press the ROUTE soft key
- Press the MAKE ROUTE soft key
- Position the cursor over a position or an existing waypoint, then press the soft key PLACE WAYPOINT
- Position the cursor over the next position or existing waypoint, then press the soft key PLACE WAYPOINT
- When all the waypoints in the route have been selected, press the soft key ACCEPT ROUTE
- To follow the route:
- Press the soft key GOTO
- Press the soft key FOLLOW ROUTE
Making a New Route Using the Waypoint List
- Press the ROUTE soft key
- Press the MAKE ROUTE soft key
- Press the USE WPT LIST soft key
- The Make Route screen with two columns (Waypoints, New Route) and associated soft keys will be displayed
- Use the trackpad to move between the two columns or to scroll through the lists
- Scroll through the waypoint list and highlight a waypoint you want to add to the route
- Press the soft key INSERT WAYPOINT –– the waypoint will be added below the highlighted position in the route
- When all the waypoints in the route have been selected, press the soft key ACCEPT ROUTE
Saving a Route
- To save a route in a database list:
- Press the soft key ROUTE
- Press the soft key MORE
- Press the soft key SAVE ROUTE and the pop–up screen and NAME ROUTE soft keys will appear
- Press the soft key YES and use the trackpad to name the route
- Press ENTER to confirm the name
- Press ENTER again to return to the display screen
To Follow a Saved Route
- Press the soft key ROUTE
- Press the soft key MORE
- Press the soft key ROUTE LIST
- Highlight the route you wish to follow using the trackpad
- Press the soft key SHOW ROUTE
- To follow the route:
- Press the soft key GOTO
- Press the soft key FOLLOW ROUTE
To Reverse a Route
- Press the soft key ROUTE
- Press the soft key MORE
- Press the soft key REVERSE ROUTE
- Press ENTER
- Press the soft key GOTO
- Press the soft key FOLLOW ROUTE
Tracklines
- The chartplotter can display the vessel’s track (like a wake or breadcrumb trail) on the screen
- This will allow you to see where you’ve been
- The track will remain on the screen until you clear it –– even if you turn the display off
- You can save and name up to 5 tracks in a track list database for later display
- You can convert a track into a route using SmartRoute
Display a Vessel’s Trackline
- Press MENU key
- Press the soft key TRACK SETUP and the track soft keys will be displayed
- Press the soft key MORE
- Press the soft key TRACK INTERVAL
- Use the soft key to select a time interval between track points (between 1 second and 30 minutes) or distance interval (between 0.1 nm and 1.0 nm). Raymarine allows a maximum 750 track points to be stored.
- Press ENTER
- Press the TRACK ON soft key to turn the track on
Clearing a Trackline
- Press the soft key CLEAR TRACK
- If you do not wish to save the track, press the soft key NO when prompted to NAME TRACK?
- If you want to save and name the track, press the soft key YES
- Use the trackpad to name the track
- Press ENTER to confirm the name
- Press ENTER again to return to the display
Find Course Over Ground (COG)
- When you select a destination, the chartplotter calculates COG
- Viewed from the Navdata split screen window
- Course over ground is your direction of actual movement, and is different from course made good (course you actually covered during a time interval)
Find Speed Over Ground (SOG)
- When you select a destination, the chartplotter calculates SOG
- Viewed from the Navdata split screen window
- Speed over ground is the actual speed at which you traveled between two points, and is different from speed through the water measured by your knotmeter
Find Cross Track Error
- When you select a destination, the chartplotter calculates XTE
- Viewed from the Navdata split screen window
- Cross track error is your deviation from your course, or the distance you are off course right or left of the desired course line
- An off course alarm can be set to go off if you exceed the distance specified from the active route leg (maximum cross track error)
Determine Estimated Time of Arrival (ETA)
- When you select a destination or waypoint, the chartplotter calculates ETA
- Viewed from the Navdata split screen window
- ETA is the time when you should arrive at your destination, given your current speed over ground
Set Arrival and Anchor Alarms
- Press the ALARMS key
- An Alarms Set Up Menu will appear
- Use the trackpad to highlight the option you wish to change
- Use the soft keys to adjust the alarm setting
- You can toggle and alarm off so that it will not sound
- Press ENTER to save the changes and return to the display

Alarms & Timers
- Countdown timers and an alarm clock can also be set from the same screen
- Press any key to turn off (silence) an alarm which is sounding, and clear the alarm message from the display screen
Measure Distances: Obtain a Range and Bearing to an Object or Position
You can measure the distance and bearing between two objects on the screen using the VRM / EBL key
- Place the cursor on point A
- Press the VRM / EBL key
- The letter A will appear at the cursor location and a data box named RULER will appear on the screen
- Use the trackpad to move the cursor to point B
- A line will connect points A and B and the data box will show the length of the line and the bearing from point A to B
- Press ENTER to fix the end point of the ruler at point B, and return to normal cursor control
Editing or Clearing a Ruler Line
To reposition one end of the ruler line:
- Place the cursor over the line until the letters A – B are displayed
- Press ENTER to get cursor control of the line
- When you move the cursor to the new point B the info in the data box will be updated
- Press ENTER again to fix the end point of the ruler at point B, and return to normal cursor control
To clear the ruler line and data box:
- Place the cursor over the line until the letters A – B are displayed
- Press CLEAR
Acquire Information About a Charted Object
- Information about lights, buoys, marinas, bridges, tidal data, hazards to navigation… may be included on the chart card and indicated by a symbol
- Port area information may also be displayed (Ex. location of marinas, yacht clubs, fuel docks, pump outs, USCG, U.S. Customs, post office, restaurants…)
- To obtain information about the object, move the cursor over the symbol
- A data box will appear on the display screen
- To get additional info or more detail, press ENTER
- Use the trackpad to move through the selections, then press ENTER to view the details
- Press CLEAR twice to return to the regular display
Use the MOB Function: Data Log Mode
- You can set the chartplotter to log your position at a set interval (every 30 minutes)
- Press DISPLAY to access the data log screen
- Time, vessel position, and course made good (CMG) and distance made good (DMG) since the last log entry are displayed
- Press the soft keys to obtain information, clear, start or restart a log
- A dashed line will appear in the display before the first new entry made when the chartplotter is turned on
- Press DISPLAY to switch modes back to Chartplotter or RADAR, then press ENTER
| Time | Position | CMG | DMG |
|---|---|---|---|
| 13:30 | 33° 34.9′ N 117° 53.2′ W |
162° | 0.00 nm |
| 14:00 | 33° 32.3′ N 117° 52.7′ W |
164° | 2.75 nm |
| 14:30 | 33° 30.1′ N 117° 51.9′ W |
163° | 3.25 nm |
| 15:00 | 33° 29.2′ N 117° 50.8′ W |
162° | 3.15 nm |